
PS2it
Well-known member
Hopefully, someone can get their Mac II working with some of this information! I tried to document the steps and any snags that I had along the way.
At our last library show, @DeanG brought his Macintosh II along, and it got me thinking about mine. So right after I got home and unloaded everything I took it off the shelf to look at it. 6 or 7 years ago when I first picked it up it didn't work at all, which is to be expected from these machines. I was pretty new to recapping, but using some radial caps and "jump starting" it, I was able to get it to chime and display. Even though it worked, I wasn't happy with the way the new caps looked, so I took them off, including about 7 of the surface mount pads. I was pretty frustrated so I set it off to the side, until last weekend...
By this point, I'm sure that you've seen at least one video on a Mac recap, and because I already took them out we'll skip this step!
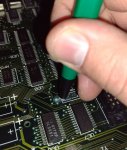
Because I damaged the board removing my sorry excuse for a recap, I wanted to clean the affected areas a little. For this, I used a fiberglass pencil. These things are nice to have! I can even count how many times it has come in handy!
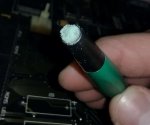
I also took this time to scrub some of the traces that looked like they might be broken. It also is useful for cleaning up any of the vias (holes, from one side of the PCB to the other) from any corrosion, this is especially helpful for any battery or cap leakage.
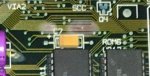
Here is the finished product. This was by far the worst area, and it had me wondering how I could add caps to the board. Originally I had planned on running a small jumper wire from the vias to a new surface mount cap, but I didn't want to risk knocking the cap off. Thankfully, Apple had already thought of this for me! Those vias next that the trace runs to from the SMD pad are also spots for through-hole axial caps, similar to the one on the right side of the picture!
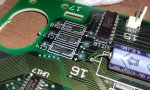
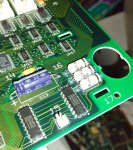
Now that I knew I needed to get some axial caps on order, I took some time to solder some SMD caps on the pads that were still there. I mentioned it in another post, but I prefer to use tantalum when recapping Macs, this way I can avoid any future leaks. These are 47uF 25v tantalums.
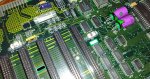
With the arrival of the new axial caps and batteries, we can go ahead and install them!
It should work now! Right?
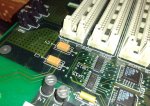
Sort of! It'll boot if you jump-start it, but not from the keyboard or power button. You can barely see it in this picture, but there is a group of traces above the cap at C7. When I first mapped out this trace, I thought I went to the test pads by the NuBus slots. It turns out that it's actually part of the soft power circuit. This power circuit eliminates the need for the AC rocker switch (like on compact Macs), instead, it allows you to boot from the keyboard or the button on the back. This design requires the use of a 3v or 3.6v battery in order for the power button to work, hence the need for them to be jump-started. I'm not going to go into the workings of the circuit, instead, I suggest you read Doug Brown's write-up about it here! He describes the schematic and explains some of the common issues and troubleshooting steps.
I also had a broken trace around C3 and C4, these are common spots for broken traces in the soft power circuit.
** This is the perfect time to mention that it never hurts to check again, and again. I'm pretty sure I traced out that broken trace 3 or 4 times until I was satisfied with my results. **
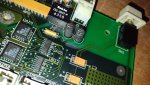
In order to fix the broken trace above C7, on the bottom of the board I ran a wire from R3 all the way to R12. I also ran a wire from the switch to the line filter by the ADB ports.

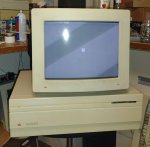
Now we've got a working Macintosh II, and it only took 6 years!
At our last library show, @DeanG brought his Macintosh II along, and it got me thinking about mine. So right after I got home and unloaded everything I took it off the shelf to look at it. 6 or 7 years ago when I first picked it up it didn't work at all, which is to be expected from these machines. I was pretty new to recapping, but using some radial caps and "jump starting" it, I was able to get it to chime and display. Even though it worked, I wasn't happy with the way the new caps looked, so I took them off, including about 7 of the surface mount pads. I was pretty frustrated so I set it off to the side, until last weekend...
By this point, I'm sure that you've seen at least one video on a Mac recap, and because I already took them out we'll skip this step!
Because I damaged the board removing my sorry excuse for a recap, I wanted to clean the affected areas a little. For this, I used a fiberglass pencil. These things are nice to have! I can even count how many times it has come in handy!
I also took this time to scrub some of the traces that looked like they might be broken. It also is useful for cleaning up any of the vias (holes, from one side of the PCB to the other) from any corrosion, this is especially helpful for any battery or cap leakage.
Here is the finished product. This was by far the worst area, and it had me wondering how I could add caps to the board. Originally I had planned on running a small jumper wire from the vias to a new surface mount cap, but I didn't want to risk knocking the cap off. Thankfully, Apple had already thought of this for me! Those vias next that the trace runs to from the SMD pad are also spots for through-hole axial caps, similar to the one on the right side of the picture!
Now that I knew I needed to get some axial caps on order, I took some time to solder some SMD caps on the pads that were still there. I mentioned it in another post, but I prefer to use tantalum when recapping Macs, this way I can avoid any future leaks. These are 47uF 25v tantalums.
With the arrival of the new axial caps and batteries, we can go ahead and install them!
It should work now! Right?
Sort of! It'll boot if you jump-start it, but not from the keyboard or power button. You can barely see it in this picture, but there is a group of traces above the cap at C7. When I first mapped out this trace, I thought I went to the test pads by the NuBus slots. It turns out that it's actually part of the soft power circuit. This power circuit eliminates the need for the AC rocker switch (like on compact Macs), instead, it allows you to boot from the keyboard or the button on the back. This design requires the use of a 3v or 3.6v battery in order for the power button to work, hence the need for them to be jump-started. I'm not going to go into the workings of the circuit, instead, I suggest you read Doug Brown's write-up about it here! He describes the schematic and explains some of the common issues and troubleshooting steps.
I also had a broken trace around C3 and C4, these are common spots for broken traces in the soft power circuit.
** This is the perfect time to mention that it never hurts to check again, and again. I'm pretty sure I traced out that broken trace 3 or 4 times until I was satisfied with my results. **
In order to fix the broken trace above C7, on the bottom of the board I ran a wire from R3 all the way to R12. I also ran a wire from the switch to the line filter by the ADB ports.
Now we've got a working Macintosh II, and it only took 6 years!
Last edited: